
jelly beans “commercial spot”
My jelly beans pseudo commercial started life as a simple test of the then-new Bullet dynamics solver for MASH, which had just been introduced for (I think) Maya 2018. I had some downtime in my job at PlayStation and spent some time playing with it, testing how much power I could leverage from it. In particular I was interested to see how easily I could use Bullet to fill up a container with objects, something that had previously been quite difficult to do dynamically in Maya.
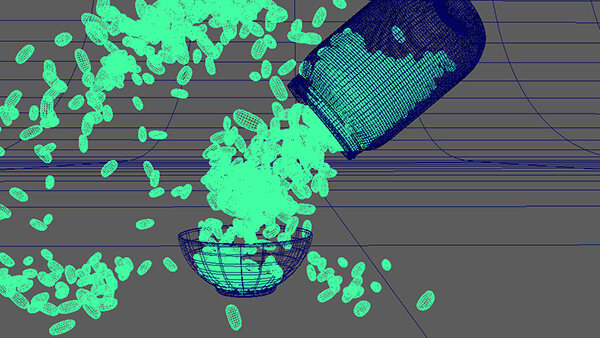
I soon found that Bullet was more than capable of doing this, especially when I used one of its built-in collision shapes, in this case the capsule which lends itself nicely to a bean shape.
The germ of an idea was born (or a bean was planted), and the testing started to morph into what would turn out to be a pretty long project…
FILLING THE JAR and CREATING COLLISions
Using a MASH network with just two variations of bean geometry and the capsule collision shape, I set about filling up a simple jar-type shape. I quickly got this working very well, and with a few attempts and tests to set the usual key dynamic properties such as friction, damping, mass and bounce to remove as much jitter as possible, it was fairly easy to create an entire full jar of beans.
I achieved this by animating the Number of Points attribute on the MASH distribute node, effectively creating an emitter (fun fact: there are 936 jelly beans in the jar!). Once I was happy with the way the beans had filled the jar, I set an initial state on the network, and muted the animation on the distribute node to prevent any more beans from being emitted.
I discovered that in order to get the most stable collision results, rather than add objects to the bean MASH network as collision objects it was better to create separate MASH networks for each colliding object. By then making those dynamic, they were automatically connected to the same Bullet solver and would "see" one another and collisions would be created. Fun!
So the jar, bowl and lid collision objects are all in their own separate MASH networks, simply with Number of Points set to 1 to avoid unnecessary duplicates being generated. Dynamics nodes were added to each one, with all other dynamics properties dialed down to zero as of course other than collisions with the beans I did not want any of these elements to behave dynamically.
It took a bit of experimentation to figure out what needed to be adjusted on the dynamics nodes, but included dialing attributes such as initial velocity and gravity to zero, or as near to zero as possible.
All four of the main collision objects were inside their own dynamic but passive MASH network, all sharing a single Bullet solver. Collisions with the ground were made using the solver’s floor.
For the jar and lid, which I wanted to animate, I then created constraints set to "Glue" and "Connect to Point" and plugged in a locator to each as the Controller Null. The lid controller was made a child of the jar controller.
I used simple low-poly objects for collisions, with higher resolution render versions of the lid and jar within their respective hierarchies to inherit motion. Now I could animate the lid whipping off, and the jar tipping any way I wanted.
creating the simulation and ANIMATION
Creating the simulation was, typically, a lot of trial and error. This type of dynamic simulation is by its nature time-consuming. I wanted to get a "perfect" dump of the beans into the bowl, and be able to slam the jar down again without any cheats or errant beans passing through or getting stuck in the sides of objects, or under the jar.
Attributes on the Bullet solver such as Internal Frame Rate and Collision Iterations were both increased from the defaults to get better results. It was a lot of running the sim (usually PlayBlasting in order to be able to view it with real-time playback), tweaking settings, then trying again.
I was, however, delighted at how good the Bullet solver was at creating things like realistic whipping rotations on the beans in reaction to the jar’s animation, or the way the "backwash" beans land in the jar and slide up and down the sides before settling. Despite the hard cuts in the final edit, the bean animation itself is actually one single continuous dynamic simulation.
Due to working quickly and this being a bit of a seat of pants project, as I got further into the shot and realized I wanted to make this a pretty polished piece, I started noticing certain collisions and penetrations of the beans that weren't working as well as I'd like. At the head of the shot some of the beans were obviously penetrating the inner wall of the jar, while at the end some weren't making clean contact with the ground plane.
The beans were exported as an alembic file, then imported back into a lighting file as a single mesh object.
Since the beans were not individual objects but a single mesh I got around this by identifying problem beans, selecting all the vertices in that bean and creating a cluster, which I was then able to counter animate into or out of position to fix the problem. This was a quick and easy fix. The animated bean mesh was then exported to an alembic file, and imported into a shading and lighting file.
SHADING AND LIGHTING
I'd created randomness in the beans' colors for preview purposes using ID and color nodes in the MASH network. However, this only gave me uniform color variations and I knew I wanted to be able to shade them like real jelly beans, with some having uniform color but others with patterns. I found that by exporting the beans' MASH reproMesh as an alembic file I could keep the per-vertex color information that was enabling the color variation. This however meant breaking the instancing of the MASH network, so now I had to work with a fairly heavy single poly shell that contained ALL of the beans.
After enabling the extra Vray attributes on a Sampler Info node, I connected its vrayRandomByPolyShell attribute into the vCoord attribute of a ramp. This then enabled me to get Vray to render the randomized IDs from the vertex color information baked out of the MASH color node. I could add as many colors into this ramp as I wanted, and control their distribution across the beans by moving the ramp's color index sliders around.
Jelly beans have a lot of subsurface scattering, so it was obvious the best shading choice was a Vray Fast SSS shader. My first and "master" ramp was plugged into the Diffuse color slot of this shader. Because the beans all shared a single shell, I was able to apply a single shader to all of them. This however meant I would have to drive all of the shading attributes of each color of bean -- in particular the diffuse and subsurface characteristics -- via a series of ramps.
Since I still wanted to play with the overall number of colors and distribution of the types of beans, I quickly realized the best approach would be to connect the Color Entry List values of the Diffuse ramp to the Color Entry List of whatever other ramps I needed to control each bean type's shading. If I changed color distribution by moving one of the sliders in the Diffuse ramp, all the connected ramps would update automatically. If I added or deleted a color in the Diffuse ramp, I simply had to make sure I added and connected, or deleted, the same entry in the other ramps.
The jelly bean shading network relied heavily on 3D procedural textures such as volume noise, and for rendering required a texture reference object be created to avoid “swimming” through the animation.
Overall jelly bean color distribution and a lot of the beans’ main shading attributes were controlled with ramps. The master Diffuse ramp drove the Color Entry List positions of all the downstream ramps so that I didn’t need to edit each one every time I made a change to color distribution.
In the end I determined I needed ramps for Diffuse, Scatter Color, and Subsurface Color. I added another grayscale ramp between the outputs of the Diffuse and in the input of the material so that I could keep a more saturated color in the master ramp but have control over value output. It became quite confusing keeping track of which bean color was which in the ramps, so having really saturated colors in the Diffuse was a help. Further ramps were added later for masking purposes of certain things, as well as for generating four sets of RGB mattes to give me masks for the 12 types of beans that I eventually settled on.
I realized that it wasn't really going to be possible to do too much comp work -- the nature of the shot, with beans being refracted through glass, then passing out of the jar, meant that I needed to make shading and lighting work properly right in-camera. Lighting was fairly simple, with an HDRI dome light and a few rect lights. The environment is a standard curved product-shoot type cyc. The rest was just about a lot (a LOT) of trial and error tweaking ramps and shading attributes for each bean in turn.
It's an entirely procedural shading network, with 3D nodes being used to create some of the more complex bean types, being the pink, cookies 'n' cream, and mottled green ones. The shader evolved over time and finally resulted in a couple of layered shaders at the top of the chain, one to add an overall shiny coating. I also added volume noise as a displacement map to create some more subtle randomness to the shape of the beans.
I also spent a fair bit of time on the jar/glass shader, getting just the right amount of soft falloff on the displacement map for the jar's Mason logo and other elements. I sourced the Ball logo online, and made the jar’s displacement map in Photoshop. Getting just the right color in the glass took a number of attempts as well. Turns out that adding a bit of green fog into the shader is what's needed to give that "Mason jar" look to the glass type.
RENDERING, COMPositING AND THE EDIT
Because of the procedural nature of the bean shading network, I had to create a texture reference object before rendering to prevent 3D textures swimming though the bean geometry during the animation. This, coupled with all of the subsurface scattering, displacement, in-camera motion blur and depth of field (no way to do this in post with a shot like this), and glossy reflections and refractions meant that render times were very high, unsurprisingly.
With the render resources I had at my disposal, it wasn't practical to render at high quality. After doing some tests with Vray's deNoiser render element and standalone denoiser tool, and found that I was able to render at lower quality, clean up noise by running the denoiser, and still get acceptable results.

I was able to use the same Sampler Info node plugged into four ramps with pure RGB colors (the other 9 beans in each case were set to black) to generate a matte for each of the 12 colors of bean.
Originally the shot was a single camera move, starting and ending with what are now the head and tail of the shot in one continuous take. I later decided that I wanted to add in a couple of cuts to give it more a commercial spot feel, so I designed two more cameras to “film” the same animation.
The slo-mo cut was rendered from a version saved out with a scene time warp added to slow it down, and some slightly adjusted lighting.
I output multichannel EXRs and composited and edited the shot in After Effects. Although I did output standard render passes, as well as as RGB mattes so I could isolate each bean color, in the end I did minimal post work beyond some simple gamma correction.
WHAT I LEARNED
Lighting and shading went through a lot (A LOT) of iterations. Top left is first pass, to the final at bottom right.
As is often the case after finishing a CG project, you’ve learned a few things and often wish that you could go back and do things over a different way. Here’s a few of the lessons I learned!
I could have tried using a ramp to control distribution of separate shaders for the beans, instead of driving a single shader through a series of ramps.
If I had planned bean types and distribution more carefully and created the simulation using 12 types of bean from the beginning, I could have avoided the need to drive everything through a shading network. There are pros and cons to this — it would have made the whole process a lot easier and I could have had 12 separate shaders to work with. However, the process I used means that every single jelly bean in the shot is genuinely unique.
Jelly beans are actually fatter and squatter than the more kidney bean shape I used. I didn’t realize this until I got into the shading and lighting work and went and bought some Jelly Belly beans for reference. Changing their shape would have meant re-running the simulation in order to make the collisions work with a different bean shape. I decided I’d have to live with it :(